Category Archives: tips
T-L.i.f.e. Blog:
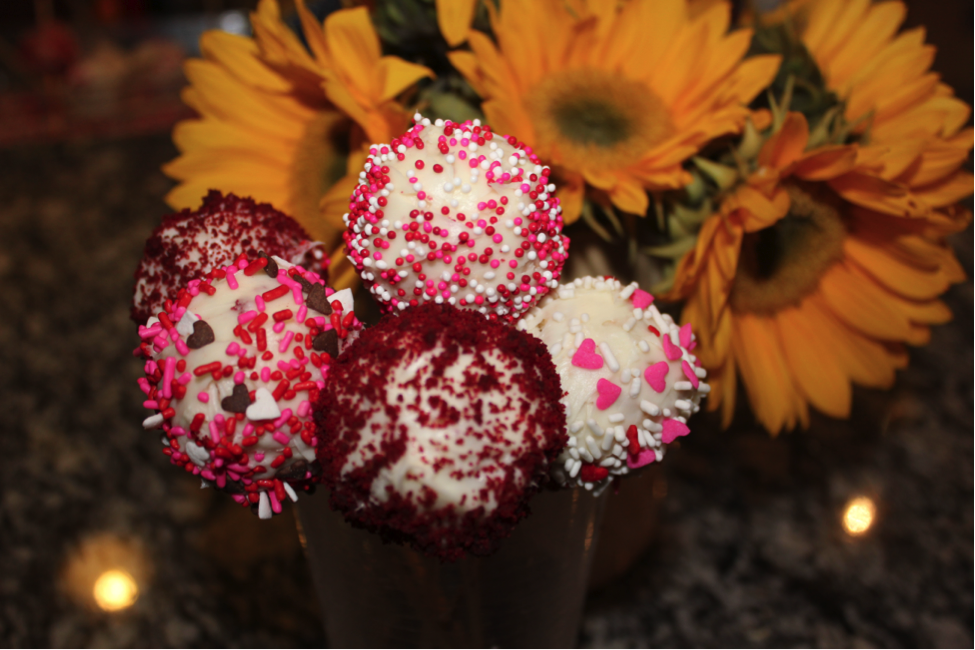
The Cake and Rice Krispie Pops Flower Bouquet

A bouquet of flowers are nice to look at but a bouquet of cake and Rice Krispie pops are pretty to look at it AND delicious to eat! The good news is that the recipe is easy and versatile, so you can make it work for any occasion. Tamagotchi L.i.f.e. is all about spreading the love and you can surely do so with these pretty and delicious treats!
Please refer to the directions and ingredients listed on the Rice Krispie and Red Velvet Cake Pops.
Ingredients/Materials:
- 1 pkg. cream cheese frosting
- Sprinkles
- Skewers or lollipop sticks (can be found at craft stores)
- Red Velvet Cake (Pkg. Cake mix, water, vegetable oil, eggs)
- Rice Krispie Treats (Rice Krispie cereal, marshmallows, butter)
Directions:
1. PACKAGE DIRECTIONS:
Follow the directions listed on the cereal and cake mix packages for Rice Krispie treats and Red Velvet cake
2. COOL:
Allow baked cake and Rice Krispie treats to cool
3. PREPARE THE POP TOPS:
Cake- Finely crumble cake and mix with 2 TBSP of cream cheese frosting. Compress the cake crumbs into 1-2 inch balls
Rice Krispie Treats- Compress the Rice Krispie Treats into 1-2 inch balls
4. FREEZE:
Freeze the pop tops for 30 minutes
5. PREPARE THE POP STICKS:
If you are using skewers for the pop sticks, cut the skewer to the desired length and remove the pointed ends
6. CONSTRUCT THE POPS:
Remove the frozen pop tops and carefully insert one stick into each pop top
7. DECORATE:
Frost each pop with the cream cheese frosting and decorate as you wish!
Be sure to let the cake and Rice Krispie Treats cool down before forming the cake pops!
After crumbling the cake, mix in two TBSP of cream cheese frosting.
After inserting the pop sticks into the pop tops, place on baking sheet and freeze for 30 minutes.
After removing from freezer, frost the pop tops as you’d like. This is a great chance to customize the treat for the occasion! For the Fourth of July, follow the same directions, using red velvet cake and cream cheese frosting, and just add blue sprinkles to achieve a patriotic look.
Inspired by: Flower Bouquets
T-L.i.f.e. Blog:
DIY: Nail Art Made Easy!

Tamagotchi L.i.f.e. is all about keeping up with the latest trends and my favorite new trend is nail art. It’s a simple way to express my style and change it up with very little effort. Plus, it’s a way of making a statement when I want to complement an outfit to finish the look.
So here’s my typical nail routine: 1 base coat, 2 coats (if I’m lucky) of polish, 1 top coat, and wait for my nails to dry. Like the rest of us girls on the move, I’m always so eager to do something that I never fail to smudge my perfect manicure. I always thought how great it would be if there were a nail polish that could not get smudged.
Luckily, there have been tons of nail polish strips, decals, and appliques out there lately. These nail polish strips are easy to use – you just lay the decal on your nail and file away the extra material. The best part is that there’s no wait time for your manicure to dry. Since I tried the nail strips the first time, it’s been pretty tempting to head straight for the strips and abandon my drawer full of nail polishes.
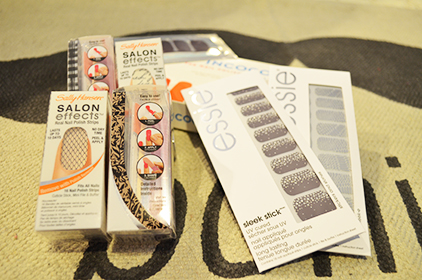
Here’s a look at my top 3 brands for nail strips:
Essie Sleek Stick Stickers
Essie makes nail appliques (meaning they’re not real nail polish and more like stickers) that come in mostly metallic and animal print designs. Each pack comes with 18 strips, a cuticle pusher and a nail filer. Although the designs of the strips are gorgeous and chic, they’re pretty hard to apply and file because they are a little stiff. Also, after wearing the strips for about a day, I had to take off 4 of the strips and replace them.
Incoco
I haven’t actually seen Incoco sold in stores, but I bought it from a mall stand. The great thing about this brand is that they make tons of solid and glitter strips that are made of real nail polish. Because it’s nail polish, it’s easier to file and fit perfectly on your nail. The only con is that it is sometimes difficult to separate the plastic cover from the nail polish strip.
Sally Hansen Salon Effects
These strips are by far my favorite. Inside each package are two sealed packages of 8 strips, a cuticle pusher, and nail filer. Similar to the Incoco strips, these are real nail polish strips that come in a variety of solids, prints, and metallic. Also, for everyone who’s budget conscious, these strips come in two sealed packages, which means you can turn one package into two manicures with a little craftiness.
These strips are my new addiction – saving me time to get back to my busy schedule. Now, I only have to schedule 10 minutes for a manicure instead of the 30 minutes I used to take. Anyone else know of any other great nail polish strips?
Blog Post By: Tiffany Chan, Southern California
T-L.i.f.e. Blog:
All About The: Button-Down Top
When you think of button-down shirts, images of men dressed in suits with briefcases in hand are likely to come to mind. But this menswear staple is becoming a staple in women’s closets. The button-down top is no longer limited to the conventional white version, as designers offer their takes on the business casual classic. And with such a variety of button-down styles, it can now be worn for a number of occasions. But the best part is that the shirt’s professional roots still shine through, giving any outfit a polished look.
These are some of my favorite takes on the button-down top—capturing the range of styles that can be found in your local mall. Just as Tamagotchi L.i.f.e. has a great appreciation of color, don’t be afraid to mix it up and add some colorful accents to create a trendy twist on these classic styles!
Fun Prep
Echoing the iconic Ralph Lauren button-down, this green version switches things up and ends the buttoning mid-torso.
Wear it: with a pair of skinny cropped pants or jeans. Go with flats for the full prep effect or a pair of Converse for a more utilitarian aesthetic.
Free-Spirit
The pinstripes may remind you of the office original, but this version’s lightweight material and loose fit sets it apart from its predecessor.
Wear it: untucked and get the full billowy effect. For an effortlessly cool look, pair it with denim cut-off shorts.
Grunge
Perhaps the most well known update to the button-down is the nineties’ grunge staple, the denim button-down.
Wear it: buttoned, unbuttoned, sleeves rolled up, with a pair of pants, or even a dress…the possibilities are endless.
Artsy
It’s the little details that make this button-down seem as if it should be hanging in an art gallery. From the semi-sheer silk fabric to the watercolor-esque purple stripes—fashionistas and art lovers alike can appreciate this top.
Wear it: with a cami layered underneath. A neutral toned cami puts the button-down in the spotlight, while a colored cami makes for a fun look.
Glam Rock
Tie-dyed, 100% silk, and cutoff sleeves, this version is a far cry from the original. But that means it’s also a far cry from the confines of a cubicle—so, wear it out for some fun!
Wear it: out. Whether you choose to pair it with heels, flats, or boots, one thing is for sure…you won’t be mistaken for a businessman.
Blog Post By: Keanne Okabayashi, Los Angeles, California
T-L.i.f.e. Blog:
BRAIDS!
The word is in, and braids are the trendiest hair fashion among young women. There are so many different ways to style your hair, and braiding really helps you change it up! The most common types of braids are those that start from the nape of the neck to the center of the head and then placed into a cute bun, even adding a bow to accessorize. I like to call these the “upside down braided buns.” They are perfect for any occasion! As someone who loves to braid hair, I have discovered that the waterfall braid has also been sported on many trendsetting fashionistas. This elegant looking braid has been the talk among young women on many fashion and beauty forums! It seems people just love the cascading look it gives them. Of course, you can also just do a simple braid, or the classic French braid, and it will still look as trendy as any of the other ones. Plus, braids are perfect for any type of climate. On a sunny day, you can wear one to stay cool and soak up the sun in shorts and a tank top with a simple bun; or, on a cold winter day, you can bundle up by adding an infinity scarf, an oversized knitted top, some skinny jeans, and a pair of cute boots. Then, top off this cozy look with either the upside down braided bun, or just a simple side braid and you’re good to go! Check out these photos of styles I just completed, including an all-new S-braid I just tried! I must say, I was quite impressed for my first time attempting this hairstyle. You should try it too-along with other classic styles! And, post your own pictures of your beautiful finished product to share your work of art. Tamagotchi L.i.f.e. is about making a fun, fashionable statement, and sharing your creativity with others. Happy braiding!
Blog Post By: Dilyara Castro, Southern California


