This gallery contains 5 photos.
It’s not long to Thanksgiving Day now and I’ve come up with a super-easy DIY that you can make ready for the big day. It’s so easy to do that you can get the children involved and they will love … (more)
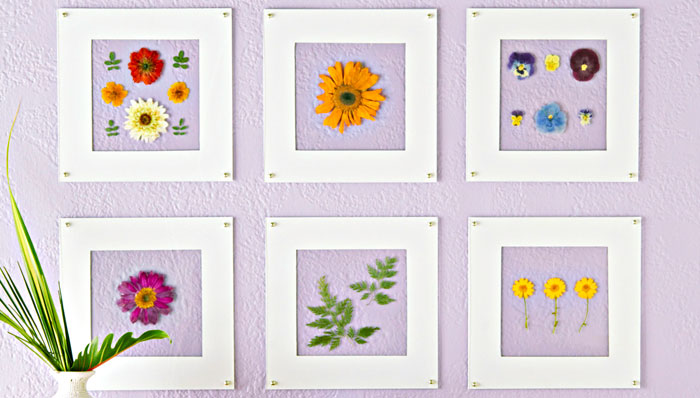
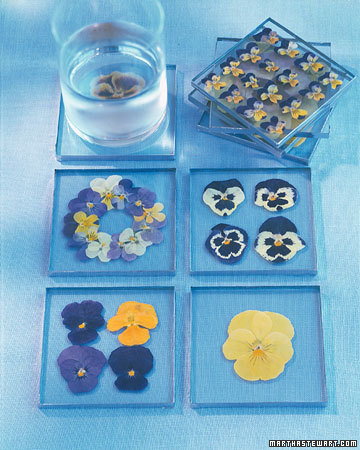
Valentine’s Day has come and gone. The flowers that you received and pressed are probably beautifully preserved by now. We totally understand the appeal of preserving happy memories so you shouldn’t be embarrassed about pressing said flowers. In fact, we will help you make your pressed flowers last longer. Check out the following DIY projects and find ways to show off your Valentine’s Day gift creatively:
1. Pendant - How lovely are these pressed flower pendants? You can find the jewelry findings in your local craft store. The trick is to find a background that will beautifully complement your pressed flower. For instance, the use of blue and yellow together look amazing here.

2. Wall Art - This is a great option if you want to be able to gaze at the pressed flowers in your home. The clear sections used for the following project are acrylic sheet cut into squares. The flowers are pressed between two squares and then hung using photo-hanging strips. All materials can be found in the hardware store.
3. Mobile Phone Case - Now THIS is utterly gorgeous. You can embellish a plain mobile phone using the flowers you pressed and with the help of clear resin. The great thing about this project is that you can most likely use all the flowers that came with your Valentine’s Day bouquet.

4. Luminaria - Another way to turn your pressed flowers into home decor is to make these beautiful candle holders. You simply sandwich the flowers between two wax paper sheets, iron, and then assemble into cubes. Place LED tea light candles inside and light up.

5. Coasters - Making these floral coasters is easy. In fact, most of the hard work will be done by the glazier. Have some glass pieces cut into 3 and 1/2″ squares. Sand the sides and sandwich flowers in between. Finish by taping the sides of the glass.
6. Sunnies - If you received tiny flowers with your Valentine’s Day bouquet, we suggest turning some of them into embellishments for your sunglasses. This is made possible by gluing the flowers to the sunglasses and letting it dry. Easy-peasy!

At this time of year the weather is cold, wet and sometimes snowy, so you’ll want to have a nice cosy knitted hat to keep your head warm! You’d probably like to help keep the rest of your family warm too, so why not embellish some plain knitted hats to give to the little ones (and the grown-ups too!) to keep them warm this Winter? Adding a cute little knitted bow or a couple of contrasting pom-poms to your hats will help make them look more fashionable for a fraction of the cost of a store-bought hat and your children will be more likely to want to wear them and keep warm!
You will need: Wool, knitting needles, darning needle, hat, scissors
To make the bow: Cast on a row of 10 or 12 stitches and continue to knit a length (like a thin scarf) which is approximately the width of your hat. Cast off and fold the length in half. Use the darning needle to stitch the ends together and turn the loop inside out. With the stitched ends in the centre of the bow, wrap a length of wool around the centre to make the middle of the bow and tuck the end in. Use more wool and the darning needle to stitch the bow to the hat.
If you’d like to watch a step-by-step video on how to knit this bow, which includes instructions on casting on and off as well as stitching the bow together, please check out my friend and fellow blogger Laurie’s knitting tutorial video on YouTube. If you would like to make a smaller bow (which can be used a button or hair-clip too!) simply reduce the length of the knitting or choose a smaller size of knitting needle.
To make the pom-poms: Wrap the wool around your hand until it is thick and puffy. Slide the loop of wool off your hand and wrap a piece of wool around the centre, pulling it tight and knotting it in the middle, leaving the ends trailing. Use the scissors to cut through the looped ends of the pom-pom and fluff it out. Thread the trailing ends of the central piece of wool through the darning needle and stitch it to the hat, either on the top, or use a second pom-pom on the sides to create ‘ears’!
You can use matching wool or contrasting colors for your bows and pom-poms. I hope you have a go at making your own DIY woolly embellishments to make unique accessories for all your family – and why not give them as gifts to your friends? They will love to receive a personalized hat that no one else will have – plus the amount of time and love you have put into embellishing the hat will show them how much they mean to you!
With Valentine’s day fast approaching I’ve come up with a simply DIY gift that you can easily make for your loved ones with time to spare. This gift is a ‘Night in at the Movies’ and includes all the snacks, treats and DVDs that you’d need to enjoy a night in with your favorite person. It’s an ideal present to give to your partner on Valentine’s day and maybe you can include a couple of action or comedy DVDs that you know the man in your life will enjoy. Or if you’re single you can even make a gift bag up for your bestie and enjoy a girly night in together watching the old classics or latest rom-com. Either way, you’ll be showing your favorite people just how important they are to you on the most romantic night of the year.
You’ll need: Scissors, small gift bag, double-sided sticky tape or glue, patterned paper or card, candy, microwave popcorn, choice of film.
Valentine’s Day always creeps up on me, and I never get a chance to get my husband a card in advance, so I can often been spotted making something myself the day before. But it’s not just my forgetfulness that means my husband has to settle for a hand-made card each year: it IS lovely to give something that you’ve spent a bit of time making yourself and they will know that you’ve been thinking of them and putting a lot of love into the card. This card design could be adapted for weddings or birthdays too so you can use it tell everyone how special they are to you!You will need: card, small scraps of fabric, thread, needle, double-sided tape, scissors, craft knife
1. Cut a piece of card that is double the size of the card that you want, then fold in half and set aside.
2. Cut a piece of fabric for the background – a little smaller on all sizes that the front of your card.
3. Cut out a design for the center of your card – I’ve used gold silk to cut out a heart shape (because your Valentine has a ‘heart of gold’!)
4. Pin the heart to the center of the fabric rectangle and stitch together – I used a machine to stitch around the heart a few times for a rustic effect but you could just as easily hand-stitch it on.
5. Use a thicker thread and stitch your chosen message onto the fabric.
6. Stick double-sided tape on the back of the finished fabric rectangle and stick to the front of your card. You can add stitches around the edge at this point if you wish.
I hope you have a go at making your own hand-stitched valentines card for the special person in your life – and don’t forget your friends and family too – you can always make a greeting card for all your favorite people to let them know that that are loved.
Valentine’s Day is almost upon us. Some of you ladies might be slightly worried that no Prince Charming has asked you out. Even that passably cute barista has not noticed your adorable smile. Now don’t go on spending another second thinking of scoring a date for February 14. You can spend the day with your favorite people instead — your girl friends! We don’t suggest doing a ritual involving the burning of love letters, no. We suggest spending your time in a more creative manner. How about a night of crafting? Here are projects that you can tackle:
This is a wonderfully easy craft project that you and your girl friends are sure to enjoy. All materials needed (letter, yarn, and glue) can easily be snatched up at a craft store near you. For the letter, you can choose the papier mache variety or something made of wood. You can even construct your own using cardboard.
Okay, this one doesn’t take a crafting genius to figure out but it’s still a fun project. It’s perfect for decorating a dorm room or for giving away as gift. You can get the Polaroid wooden frames from Michael’s. Other materials that you will need are glue, photos, scissors, and mini magnets.
3. Leather Makeup Brush Holder
Here is a craft project that is not only easy to do, but also wonderfully functional. This particular craft idea involves cutting leather or suede with slits and adding a string. Easy-peasy, right? If you want to add a bit of color, you can choose string in a non-neutral hue.
How sweet! Just because you’re not spending Valentine’s Day with someone special, it doesn’t mean that you must spurn love altogether. Because love is truly splendid, you know? To this end, we suggest making this terrifically cute cross stitch heart sweater. This can be done on any plain shirt, too.
What’s better than making your own jewelry? Making jewelry out of old shirts, of course! You and your girl friends are sure to have loads of fun turning old shirt into necklaces and bracelets.
6. Flower Crown
Flower crowns are hot right now. If you can’t get fresh flowers, there is a way to construct your crown using plastic or satin ones. After assembly, it is imperative that you and your girl friends do a Bohemian-inspired photo shoot.
7. Leather Friendship Bracelet
Friendship bracelets are making a comeback and there is no better time to make them than during your craft date with the girl friends. This version is made with leather but you can also choose to assemble yours using braided strings or embroidery floss.
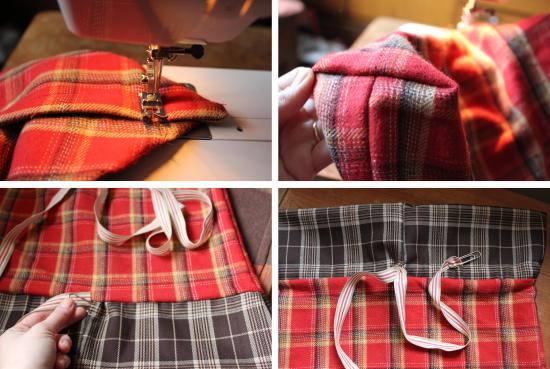
When I started preparing for Christmas this year, my head immediately filled with ideas for festive sewing projects. My favorite plan was to create Christmas gift sacks – like Santa’s sack but a little smaller, to wrap gifts with. This is a fun, Christmas Eve activity for those last-minute presents.

For my project I needed a few offcuts of different fabrics for the main bag and for the contrasting top of the sack. I chose some soft red wool tartan and a couple of other tartans and checked fabrics, that I had saved from previous projects as I’ve never been able to throw away small but perfectly usable offcuts of fabric! I got to work on creating fabric gift sacks, using the pattern from the Crafting Christmas Gifts book by J.W Capplens Forlag above.

I’m a big fan of ladylike fashion and the popularity of period TV shows such as Downton Abbey has reinforced this trend, ensuring that is will remain fashionable throughout the Fall season. A great way to follow this trend without going OTT wearing period costume is wearing pretty collars on clothing. I love a fashionable peter-pan collar on a dress or top and I’ve recently been scouring my local thrift stores to find tops and blouses with collar trims - I recently picked up this black cardigan above from a thrift store and I’ve used it as inspiration for my DIY fashion blog post for adding pretty lace collars to your knitwear. I had a tatty old cream cardigan hanging at the back of my wardrobe that I simply never wore (it’s actually got a hole in the shoulder – you can just about spot it in this photo below!) and I decided to customise it by adding a collar around the neckline and either side of the buttons. You can pick up a cardigan to customise from your local thrift store for next-to-nothing, and while you’re there, hunt around for any lace trimmings or even crochet placemats to add to your cardigan.
You will need: A cardigan or blouse, lace trim, fabric doily or haberdashery collar, pins, matching thread, needle or sewing machine
3. Do up the buttons on the cardigan and position the second half to match up with the one you have already stitched. Pin in place and repeat the sewing process to secure it in position.
I hope you’ll agree that it looks much nicer and by just adding a collar I’ve turned a cardigan that I have never worn into something that I don’t want to take off! And don’t to forget to add pretty collars to anything else that takes your fancy – maybe the neckline of a t-shirt or around the top of a dress? And little lace collars can look super-cute on children’s clothing, so think about adding a collar trim to your child’s clothing too!
If you’re getting a little bored of your sunglasses after wearing them all summer, or if you’ve picked up a bargain pair in the summer sales, maybe you’d like to funk them up with some cute applique accessories?!
I’ve spent an enjoyable hour gluing lovely things to my sunglasses and I’d recommend you do the same to breathe new life into your old accessories! I used a strong super-glue, but you can use a hot glue gun if you prefer, both of which will keep your buttons or bows safely attached. If you use the hot glue gun be very careful of the hot glue (which can burn!), but on the plus-side, your glasses will be ready to wear as soon as the glue has gone cold. The super-glue might take a few hours to set (aways follow the instructions on the pack & be very careful where you put it - you don’t want to get things stuck where they shouldn’t be!) so once it’s completely dry, you are free to wear your new sunglasses - any sooner and you’ll probably get your hair stuck in the tacky glue!
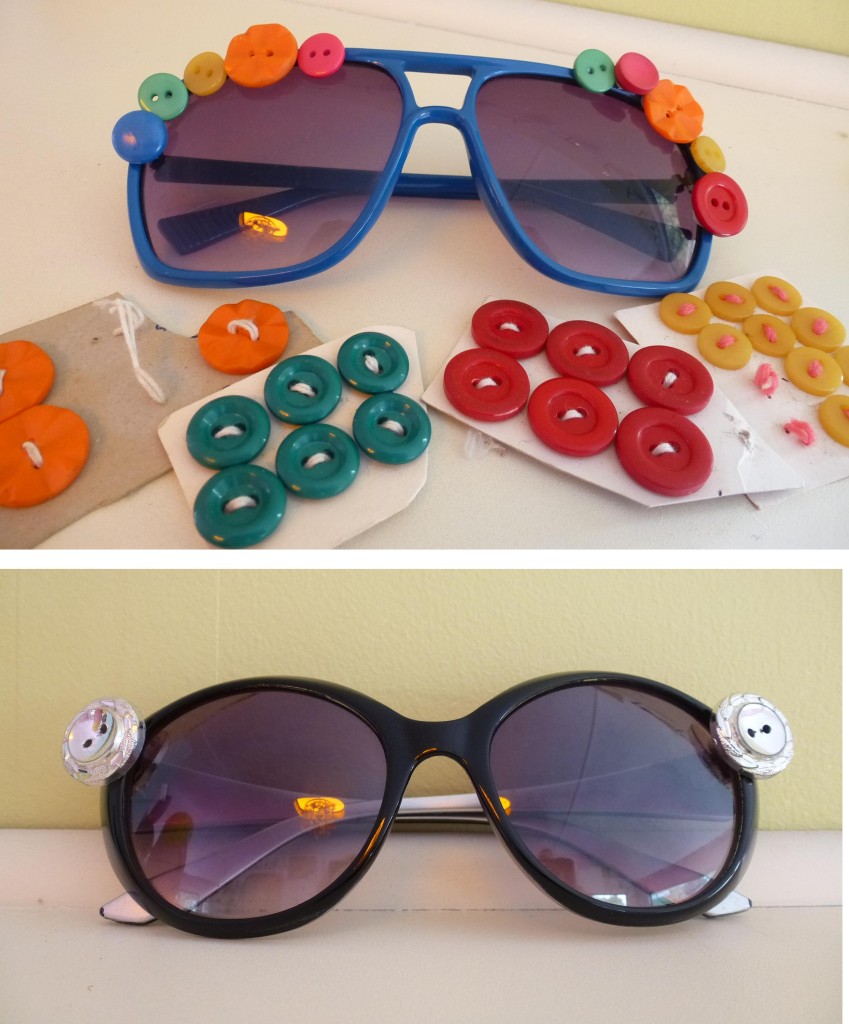
I’d recently been given a box of buttons that a relative had collected over the years, so I chose some lovely old vintage buttons to create this first pair of sunglasses, mixing and matching the colours for a funky look. I also did a ‘classy’ version with black glasses and retro silver buttons. You can get similar buttons from craft and thrift stores or try shopping online. I got these resin bows below from Wholeport online and I love this for an on-trend look - these cute cabochons are everywhere this year!
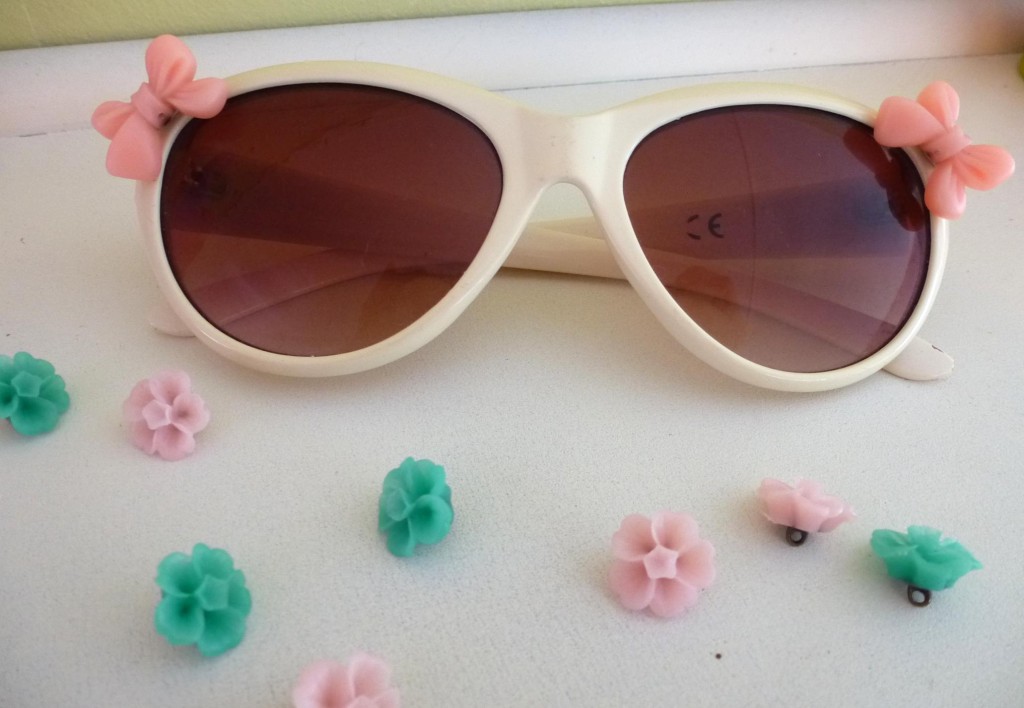
Really, anything you can think of can be added to your sunglasses - little trinkets, old earrings, artifical flowers, broken jewelry, ribbon bows etc. As long as you can still see out of your sunglasses, anything goes! Have a go for yourself and make your own unique sunglasses and when anyone asks where you got them, you can proudly say “I made them myself!”.
I cannot count the number of times I have had to get rid of perfectly good vases and candleholders because I simply don’t know what to do with them. Think about what’s left after the flowers die or when your candles’ wick is no more….what do you do with all those perfectly fine glass bottles and jars?
Add some color to them and—ta-da!—you have a new place to put pens and pencils or to hold your makeup brushes. I decided to turn three of my old vases into candleholders inspired by my favorite piece of room decoration. Since Tamagotchi L.I.F.E is all about color, I’m pretty excited to show you how I added some color to my room.
I had purchased these from a thrift store before coming to college and it is the only piece of decor I have kept throughout the years. So, I decided to create my own colored-glass inspired candle holders.

Materials:

Directions:
1. Apply tape wherever you would like a distinct border between glass colors

2. Begin layering paint
*There is no wrong way to do this. The paint dries quickly and layers thinly so you are able to ‘fix’ any decision you aren’t thrilled with

3. Allow to dry
4. Remove tape
5. Layer paint
6. Repeat steps 1-5 to achieve the look you want
This is truly a DIY based on individual taste. The best part of this DIY is that you can achieve a ton of different looks based on your color and tape decisions.
Blog Post By: Keanne Okabayashi, Los Angeles, California